In this tutorial I will show you how to sidechain in FL Studio. There are a couple ways to sidechain your sounds, in this tutorial I will use a method using only 1 plugin: Fruity Limiter. This plugin comes with every version of FL Studio. So it should be available for every Fruity user.
Note: This tutorial is made for FL Studio 12, but still applies to FL Studio 20.
What is sidechaining?
First of all, for those who don’t know; here’s a short explanation of what sidechaining is. With sidechaining you let a track (sound) influence another track.
When you link track A to track B, then track A will dip in volume to the amount you set the sidechain to every time track B is active.
A lot of EDM producers use it on their leads to make it “bounce” or to give the kick a bit of room. The best and easiest way to explain is with the two examples below.
This first example has no sidechain applied at all:
This second example has a sidechain applied to the synth track (As you notice, every time the kick hits, the lead dips):
Sidechaining can be used for a lot more than only a kick to a synth lead. However, this tutorial focusses on how to sidechain. So, let’s start!
1. Set up your tracks.
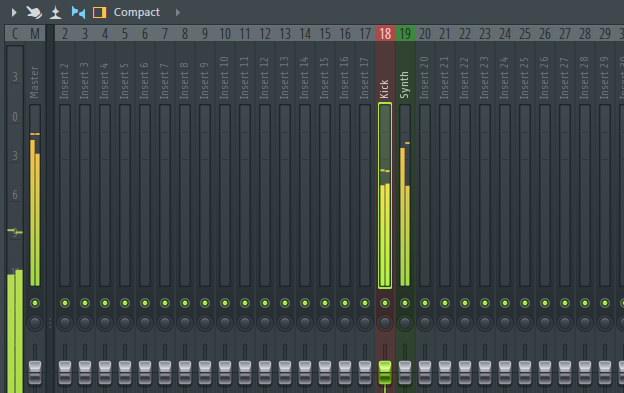
Make sure each sound has its own mixer track assigned. See image, where the kick is red and the synth is green.
2. Link your tracks.
Now click on your kick (red) in your mixer to highlight it. This will be the sound that influences the other track. Then right click on the little upwards arrow of the sound that you want to link the kick to, in this example the synth (green). Choose “Sidechain to this track”.
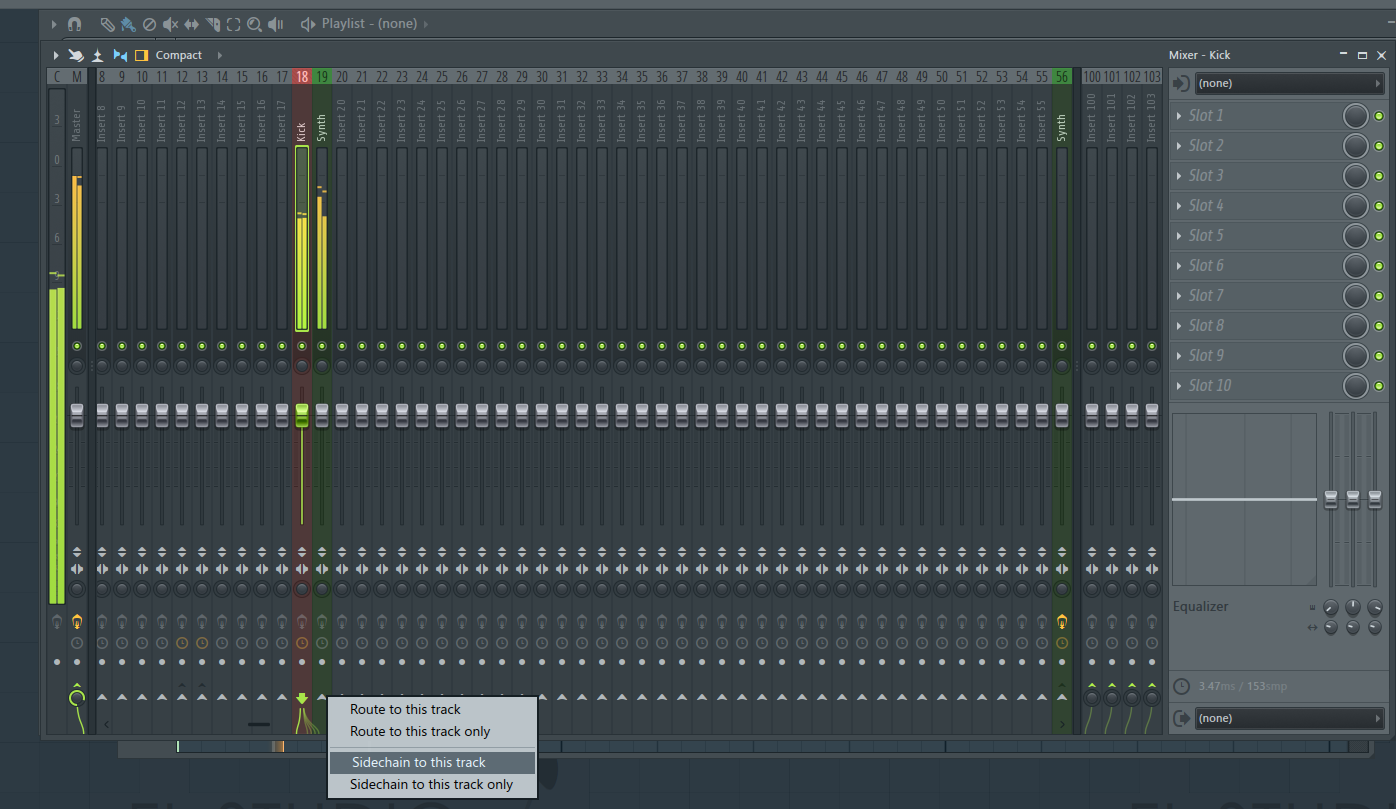
Note: If you want to cancel a sidechain, or you’ve clicked on the wrong track, simply select your kick track and then hit the little green arrow of the synth track. Now the link is canceled.
In the comments below Chandler asked how to use a sidechain, but mute the kick. Follow these steps to achieve that:
1. Select the mixer channel (track) where your kick is assigned to. In my example the red channel.
2. If you take a look at the image above, you can see that below the master channel there’s a green knob (bottom left of the image). Turn it down. This will mute your kick, but it will keep the sidechain.
3. Add Fruity Limiter.
Add the Fruity Limiter plugin to the track where you want to apply the sidechain to. In this example the synth track.
4. Settings for Fruity Limiter.
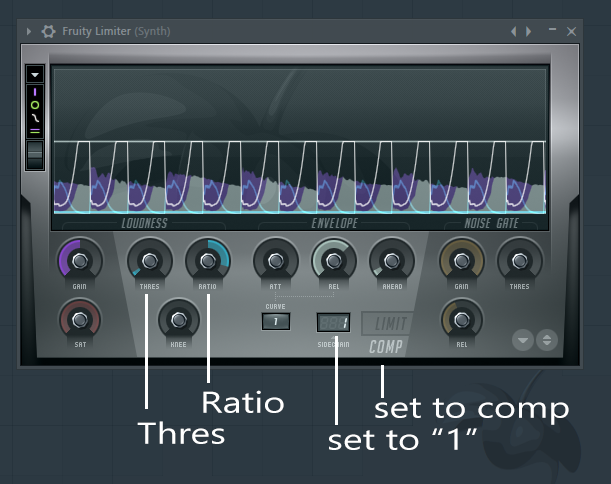
First of all set the limiter to Comp and then the sidechain to 1. After that you set your Ratio knob almost entirely to the right.
Now you can add the amount of sidechain with the Thres knob. When you play your song (or just the two sounds together), you can see how much the kick is making the synth dip.
Play around with the Threshold and Ratio settings to get an understanding of how it works and what amount works best for your track.
So this is how you sidechain a synth with a kick. However, like I said, there are more ways to achieve the same results and there are countless possibilities with sidechaining. This is just the most common way to use it. If you have any questions, please feel free to drop a comment below or contact us directly!
Looking for some samples to use in FL Studio? Check out our Premium Sample Packs (only 1 dollar each) or our Free Downloads page!
Thank you very much!!!
quick and easy
thanks!
No problem! I’m planning on doing some more “quick and easy” tutorials 🙂
Thanks!!! simple and clear, not only get how to use it, I get how it works in a easy and fine way. I really apreciate it, thanks a lot!!!
Thanks for reading our blog, glad you like it!
How should I mute the kick sound and get the sidechain?
Hi Chandler!
Good question, I will add this to the article soon:
After creating the sidechain:
1. Select the mixer channel (track) where your kick is assigned to. In my example the red channel.
2. If you take a look at the image of Step 2, you can see that below the master channel there’s a green knob (bottom left of the image). Turn it down. This will mute your kick, but it will keep the sidechain.
Tip: You can use automation (right click) on this button to only mute it in certain parts of your song.
I had this question too. Thank you!!
Hi, I have a problem. When I add the Fruity Limiter to the track it gets stuck doing waves and it doesn’t show the signal of the track the Fruity Limiter only shows waves.
Hey Guillermo, I know what you mean with the “waves”. But I can’t recreate it at the moment. Maybe it got updated, it only happens when I go the the äbout” section of the plugin.
However, I believe there’s something wrong with your input signal. So I think you should make sure you do Steps 2 and 4 correctly.
So ensure you select your “kick track” and hit the arrow of your “synth track” (the one that’s needs to be sidechained). As described in step 2.
Then at step 4, set your limiter to “comp” and if you’ve done step 2 correctly you can set “sidechain” to 1.
Hope this helps!
Good God this article was short and sweet and to the point! Thanks a lot!
I am learning FL Studio right now and have seen YouTube videos and read articles about this, but I always succumb to the details of the compressor instead of just listening!
Good God this article was short and sweet and to the point! Thanks a lot!
I am learning FL Studio right now and have seen YouTube videos and read articles about this, but I always succumb to the details of the compressor instead of just listening!